Hello everyone! I've gotten so many emails and questions about the plastic ornaments I made using the Mini Magnolia's. So here's my tutorial! There's LOTS of pictures, I'm sorry if they take a while to load or make your computer lag.
Supply List
Mini #3092 Tucked Tilda, Christmas Sentimen Stamp, Crafters Tacky Glue, Silver German Glass Glitter, Bakers Twine, Roses or Flowers, Crop o dile, eyelet, ribbon, Q-Tip, Oval Spellbinder Nestabilities, 2 ovals, one with your image and one with a sentiment, Plastic Ornament from Michaels (.99)
Put your stamped image and sentiment image back to back and use your Crop-o-Dile to make a hole.
Place your eyelet in the hole.
Tie your twine in the eyelet. Leaving the strings a little long. I would say 3-4 inches on each strand.
Put the image aside and get your ornament and take off the silver cap.
Pour your tacky glue inside.
Using your Q-Tip spread the glue all along the bottom of the ornament.
I made swirls to make it look like snow.
Add a few pinches of white FlowerSoft.
Shake it around covering the glue.
Then I add a little Silver German Glass Glitter and shake that around.
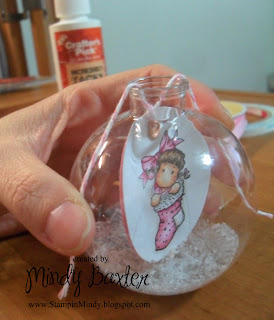
Now grab your image and round it around your finger.
Tada!
Squeeze it into the ball, leaving the twine out.
Make sure you hold the twine, so you can control the way your image is placed.
Now, with your pinky, or maybe a pencil, push, flattening the image.
Like this....
and this...
Now pull place the twin on each sid of the ornament, centering your image.
Pop the silver cap back on.
Add bows, flowers or whatever you like.
Here' the back.
Here's the first one I did, I decorated it a little different.
And the back.
I hope this helps, if you have any more questions please don't hesitate to ask!
Have a great day!


wow Mindy thanks! they are just gorgeous too!!
ReplyDeletehiya sweetie
ReplyDeletethere gorgeous hunni
thanks for sharing your tutorial sweetie
hugs angelique
Your tutorial is amazing and the result is wonderful
ReplyDeleteHugs Gretha
oh these are gorgeous! I'm going to have to keep my eyes peeled for some clear ornaments and try this for next year! thanks so much for the tutorial x
ReplyDeletefabulous tutorial! these are so sweet!
ReplyDeleteO my my this is so very pretty
ReplyDeletenow got to have some mini stamp
Thank you for showing how to do
Have a very good dat
Thank you for such detailed and helpful tutorial!!
ReplyDeleteOh these are gorgeous!!
ReplyDeleteThank you so much for this tutorial. I made an ornament using the same exact snnow but it stuck to the surfaces of the plastic covering up the picture, it was almost as if it was all staticky.The glue is an awesome Idea and less waste!
ReplyDeletewhat an awesome idea...thanks for sharing..
ReplyDeleteAwesome ornaments and great tutorial. It's so easy to follow and I love the twine idea to control the image.
ReplyDeleteThanks for sharing! :)
Thank you for this tutorial, it's an aswesome idea!
ReplyDeleteHug,
Maria
Hi Mindy, How brilliant this is and it looks gorgeous:) Sandra H
ReplyDeleteThese are just beatuiful thanks so much for the tut I will try it xxxx
ReplyDeleteGreat! I think I'll use part of this tutorial to make a "My first Christmas" ornament for my friend who has recently given birth :))
ReplyDeleteThanks!
Stunning project. Love it. Hugs,moni
ReplyDeleteGreat tutorial, Thanks dear!
ReplyDeleteThank you so much Mindy for posting the tutorial on your amazing ornaments. I admire all your lovely creations.
ReplyDeleteHugs...Pam:)
Hi Mindy, You did a great job with this!!! Beautiful ornaments!
ReplyDeletehugs..........
Fantastic idea. I will give it a try. Great for any occasion
ReplyDeleteThese are just gorgeous. Thanks so much for the tuturial.
ReplyDeleteHugs, Yvon
Thanks Mindy!! When I saw projects like this I wondered how on earth did they get the image so straight and not wrinkled on the inside. You've definitely made it clear and simple and I have to say "Thank You SO Much" for sharing with us. God Bless you for your generosity!!! And... your bulbs are all GORGEOUS!!!!
ReplyDeleteHugs, Cathy-Lynn
Thank you Mindy for taking the time to teach us how to put these little Tilda's inside an ornament.. I have been so curious since I first saw yours, but knowing how busy you are didn't want to ask you to stop your business and ask to share your secret, but you did and I love it.. It is so gorgous and it looks so easy.. You are just too sweet.
ReplyDeleteHugs, Jean
WOW!!! Mindy, your ornaments are totally gorgeous. Thanks for the tutorial.
ReplyDeleteHugs,
Sherry
wow this is a great job. I love the idea. Thank you very much for your lovely and very easy tutorial.
ReplyDeleteFrancy
Thanks for the tutorial, these are so gorgeous! Gotta get to JoAnn's or Michael's and find some of these glass ornaments!
ReplyDeleteCrafty Holiday Hugs,
Pendra
Wow, wow Mindy! I love this tutorial.. you are very creative. Love it!
ReplyDelete-Sony
Great Idea, Love what you did with your designs.
ReplyDeleteThanks for sharing
Mary Nell
These are so beautiful! I'm definitely going to have to try my hand at these for next Christmas!!! Thanks for sharing!
ReplyDeleteDarling ornaments, Mindy! Thanks for the step by step pictorial tut! Love it!
ReplyDeleteHuggies ~
Sharron♥
Beautiful ornament and awesome tutorial Mindy. Thanks for sharing :o)
ReplyDeleteHugs,
Cabio